Pages

Friday, July 27, 2012

I've been busy...


Things have been busy around my house this past week...  We've been doing DIY in our backyard this summer.  Besides weeding and pruning back branches and cutting down  small trees where we don't want them (don't worry, we are not deforesting!  We have quite a huge surplus of trees!)  I convinced my husband to put a new staircase on the opposite side of our deck.  "It will be easy!", I said.  "It will take you an afternoon. It's only three steps!",  I said.  So he removed a section of our deck and he began to build new stairs...  Well it took a little longer than an afternoon!  We had thunderstorms in the morning and got a late start. Now almost finished, and has just a few edge boards to cut and nail onto the railing.  All we needed was 30 minutes more but another really strong thunderstorm rolled in and we had to stop.  I cleaned out and extended a garden on one side of the deck and I have another to clear and put in today on the side next to the new steps.  The steps look awesome!  My husband did a really great job!  Having them where they are now makes access to the yard so much easier and the open space makes it more inviting to the rest of the yard! 


I finished a pillow I started last week.  It started as a color experiment and evolved into a pillow.  It's a giant granny square that I embellished with some fern like plants, flowers and of course, a dragonfly!  (the quilted pillow in the first pic is a bear paw pattern that I pieced and quilted last summer.  I made two of them for the couch.  Last summer was all sewing and quilting.  This summer it seems crocheting is my obsession!)


The back is another giant granny square in a variegated yarn.


I crocheted and took out about five different edgings before I settled on this one.

I'm also working on some hexagon blocks.  I have yet to decide what they are going to be made into.  (ignore the cat hair I just noticed!)


The colors did not come out true, the green is more mossy looking and the red is a little deeper in color.  The pattern is called African Flower with an extra color change in the flower.  The colors and design were inspired by this fabric...


I love, love this fabric!  I bought it last summer without any project in mind.  Just couldn't pass it up.  Between Thanksgiving and Christmas I made it into this bag that I keep my project yarns in.


It took a long time for me to get up the nerve to cut into it!  I just wanted to make sure that whatever I used it for, I was going to like. I was  unable to purchase more of the fabric as the shop I got it from closed.

I'm also working on a cover for my Mom's stool.


The stool is quite old and the cane is starting to unravel.  My cats keep playing with the loose pieces making it worse, so I crocheted a granny square piece for the top.


It sits near the entrance of my kitchen from the family room and are these are the colors in both rooms.  I still have to add a border.  I'm thinking something light and loopy.  It's still a work in progress, but now the cats can't pull on the loose pieces!

Of course I have been doing project planning, putting together assessment models and making poster after poster for my two rooms at school.  I have my beginning projects planned out for my K-5's.  I  have to make my examples and finish mapping out the rest of the school year. I'm going to try and get up to school the second week in August to get my supplies unpacked and my rooms together.  I have the entryway bulletin board to do in one of my schools. It needs to be up before the first day of school.  I already know what I am going to do, it's just a matter of making everything and putting it up!    Well, back to the backyard...

Tuesday, July 17, 2012

4th Grade - Pulled Paint Castles


This past spring I stumbled across a picture on Pinterest of a lesson from Mrs. Maynards Artroom.  Her sixth graders made these awesome pulled paint castles!  I loved the beauty and simplicity of the project. 

I created several practice examples before introducing this lesson to my fourth graders.  I cut  pieces of mat board into different widths.  The students created their buildings by pulling the paint across the paper.  Each table had plastic plates with cool colors.  I poured blue, green and purple paint into each plate.  Then demonstrated how to dip the edge of the mat board into the paint and pull it across the paper to create the sections of their castles.  The students loved how pulling the paint across the paper created a kind of color stain, almost like a tie-dye effect.  Some of the kids got so carried away they forgot to leave some white paper for the sky!  Those students cut the top of their paper to create the shape of the castle roof when it was dry.

The following class of students added details to their castles with black Sharpie marker, construction paper and crayons.  I created an idea packet of castles details, windows, doors, arches, etc...  The students had these to look at for ideas and inspiration while adding their details.  I'll be definitely using this technique again, the students loved it!


Tuesday, July 10, 2012

1st Grade Owls


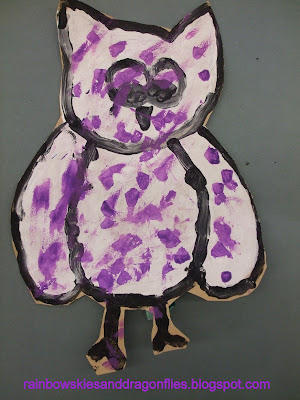
Have you noticed how popular owls are out there on the internet?  This summer while researching ideas for school next year I have seen A LOT of owls!  Owl drawings, owl paintings, crocheted owls, sewn owls, owl appliques, etc...  Around March I needed a lesson for my 1st grades that would reinforce painting skills.  I remembered seeing a post on Deep Space Sparkle that Patty posted of the cutest painted owls, I googled owl projects and found this owl project.  (I can't get it to link to the exact page. If you search owl projects on her site it is her Sept. 22 2010 post)  Art Projects for Kids  (again I can't get blogger to link to the exact page!!!  Just search how to draw owls on her home page, it's her Oct. 2, 2011 post) It's an "Owlapalooza" out there!

I sketched several different ways to draw owls with simple shapes and put them on a handout that the students had to look at while they were working, as well as demonstrating step by step instructions on how to draw them on my white board. We talked about the shapes we could use and how the shapes would fit together to create their owls.  The students sketched out their owls tracing all their pencil lines in black crayon. This way when they finished painting the owls white they could still see the lines they drew.  When they were done tracing they painted everything white.  I put cups of purple paint out on the tables and had them add details onto the wet white paint.  This way when they painted they were creating different shades of purple.  Ah!  The joy of mixing colors!  It never gets old!  Some of the kids really got into the monochromatic colors! (sorry no pics of those – Took the snapshots after many were handed back)  We put them on the drying racks and left them to dry.


During the second class, I put out construction paper crayons and black tempera paint.  The students were able to add any other details and colors they wanted with the crayons.  Finally, the kids outlined their owls with black tempera paint.  They used 1/4" flat brushes to outline.  I demonstrated how to use their brush to get different thicknesses in their outlines and stressed taking their time and painting patiently for the best lines and coverage.  I also reviewed how to hold the brush and how to load the right amount of paint onto their brushes.


The kids LOVED drawing and painting these!  After they were dried, the children cut their owls out.  This gave them a chance to work on their cutting skills.  A LOT of 1st graders had difficulty cutting this past school year!  I made sure to give them  many opportunities to work on their cutting skills during projects and free time.  I have one student who continually holds their scissors upside down. Throughout the school year, I worked with them, as well as their homeroom teacher, to help/teach them how to hold the scissors correctly to no avail!  They were so used to holding the scissors wrong that it was uncomfortable for the student to hold them the correct way!  (I'll keep at it next year!)  If you know anyone who has young children, stress the importance of giving young children a pair of safety scissors, show them how to use them and let them cut up some old magazines!  It gets messy but it is so good for their motor skills!

We displayed all the owls in the hallways.  I turned them in different directions to give it the illusion that they were flying!  Enjoy looking at them!  They make me smile every time I see them!


Tuesday, July 3, 2012

Art Assessment


Art Assessment...  For years I have struggled with how to assess my student's artwork without hindering their imagination and willingness to explore their natural creativity as well as at the same time follow the parameters laid before me by the state and my school district.  Art is Self-Expression and I never (nor do I think I will ever) feel comfortable putting a "Grade" on it.  I spend years trying to build up my students self-esteem, working to get them to willingly try new techniques and media without worrying about "Is it good enough?" Then they advance to the upper elementary grades and suddenly they freak out because they are now getting letter grades for art!

For some of them they now start to think they are not going to be good enough to get a good grade in art.  The "I can't draw" – "I'm not good at art" etc...  Phrases start to slip back in!  I have been dealing with having to give letter grades to my 3rd - 5th grades for two years now.  Working it out, making a great rubric that I think is fair and covers all aspects of a project.  It is based on project objectives and art learning. 

Enter our new teacher evaluation system...  Part of my yearly evaluation is going to be based on assessment.  Since I am a subject area that is not state tested, I need to come up with concrete assessment strategies that show student growth.  I have been researching this subject for quite sometime now and collecting my findings on my Pinterest board as well as collecting articles and ideas in a folder.  During my searches I found  a lot of really great information and been inspiration by The Art of Ed.  Jessica has a number of great and insightful articles on the subject at her blog.

One of the best resources I have found through all my research is Jessica's e-book, The Complete Guide to Simple Art Assessments.  (you can find it under her Jan 12, 2012 post in the last link).  I purchased it towards the end of the school year and just recently sat down to read it cover to cover.  I STRONGLY recommend this book to all of you!  It is chock full of ideas and strategies that can be used from K to high school!  You can either use the strategies the way they are or adapt them to fit your needs.  I already have decided on some ideas that I'm going to be working with come the first day of school in September!  I'm going to be adapting how I manage the students art portfolios, create a self-assessment for the students to use after a project is completed, and re-vamp my own grading rubric.


I love the idea of exit slips and I am going to adapt them into an assessment that the students will fill out when they complete a project.  It will need to be handed in with their art work.  Now mind you none of this is concrete and I will be evaluating how different methods are working and adapt them from there.

Our Visual and Performing Arts curriculum was also revised last year.  The Art and Music teachers from our three sending districts got together for three Mind-Numbing days to re-write our district arts curriculum.  We are now working with Big Ideas, Essential Questions and Enduring Understandings.  We came up with four Big Ideas:

        1. Aesthetic Responses and critique Methodologies
        2. Creative Process
        3. History of the Arts and Culture
        4. Performance

Each Big idea has their own Essential Questions and Enduring Understandings.  As a result of this new curriculum, I am going to be posting and discussing with my students Essential Questions that pertain to the lesson we are working on.  I will leave them posted for the duration of the lesson so we can refer back to them during the project.

Have any of you read Jessica's book or blogs on Art Assessment?  Do you have any assessment strategies/methods that you find work well?  Are any of you in the same boat as me and have to now show assessment as part of your yearly observations?  Please Post a comment, I'm interested in what your thoughts are!


On a lighter note...  The tote bag I have been working on is starting to take shape!  I am playing with the idea of a tassel on the bottom.  The green bead on the bottom (forgot to take a close-up picture of it) is a fused glass bead that was made by one of my colleagues at school.  She creates beautiful beads that she turns into necklaces,earrings and bracelets. Her students gave them to me in the form of earrings back in February as a gift for being named our school's Teacher of the Year.   Alas, I broke one of the earrings so I saved the beads and I am incorporating them into my tote.  The other bead is going at the top as a button for a strap closure.  I still have the closure and the strap to make.


I also made this little guy last week.  He is hanging cheerfully from my fireplace mantle. Found the inspiration for him on Pinterest.  The link is on my Textiles and Fibers Board. (click on the word Pinterest in the last sentence to get there).  I love folk art and he has that feel to me!  Hope you all are enjoying your summer so far!  :)